
Traefik is a powerful edge router that makes it easy to direct HTTP/S, TCP, and UDP traffic throughout your infrastructure. It works with a variety of backends and performs automatic configuration discovery to decide what should be routed where.
This tutorial provides detailed instructions on how to deploy Traefik, add an SSL secret into Kubernetes, and route secured traffic to your Kubernetes service.
Prerequisites
Before following the steps in this tutorial, ensure you have done the following:
- Installed Docker Desktop with Kubernetes or another local Kubernetes cluster such as minikube
- Installed helm
- Added
127.0.0.1 traefiktest.localinto/etc/hostsif on Linux or toC:\Windows\system32\drivers\etc\hostsif on Windows
With that out of the way, let’s get started!
Deploy the Traefik Helm Chart
First, we will deploy the Traefik helm chart. This will create all of the custom resource definitions that Traefik requires and create a Traefik deployment and service to handle load balancing. We will create the new helm release in the traefik namespace:
# Add the traefik helm repo
helm repo add traefik https://helm.traefik.io/traefik

# Update the list of charts in each added helm repo
helm repo update

# Create the new traefik namespace
kubectl create namespace traefik

# Install the traefik helm release into the traefik namespace
helm install traefik traefik/traefik -n traefik
After the new traefik release has been created, verify it using helm list -n traefik and kubectl get all -n traefik:
helm list -n traefik
NAME    NAMESPACE       REVISION        UPDATED                                 STATUS          CHART           APP VERSION
traefik traefik         1               2020-11-08 15:07:23.687759 -0600 CST    deployed        traefik-9.10.1  2.3.1

NAME                           READY   STATUS    RESTARTS   AGE
pod/traefik-7877ff76c9-2rmcj   1/1     Running   0          50m

NAME              TYPE           CLUSTER-IP      EXTERNAL-IP   PORT(S)                      AGE
service/traefik   LoadBalancer   10.99.231.229   localhost     80:31649/TCP,443:31020/TCP   50m

NAME                      READY   UP-TO-DATE   AVAILABLE   AGE
deployment.apps/traefik   1/1     1            1           50m

NAME                                 DESIRED   CURRENT   READY   AGE
replicaset.apps/traefik-7877ff76c9   1         1         1       50m
Create Self-Signed SSL Certificate
Next we will create a self-signed SSL certificate to use for traefiktest.local using openssl:
openssl req -x509 -newkey rsa:4096 -keyout traefiktest.key -out traefiktest.crt -days 365 -nodes
Generating a RSA private key
...........................++++
......................................................................................++++
writing new private key to 'traefiktest.key'
-----
You are about to be asked to enter information that will be incorporated
into your certificate request.
What you are about to enter is what is called a Distinguished Name or a DN.
There are quite a few fields but you can leave some blank
For some fields there will be a default value,
If you enter '.', the field will be left blank.
-----
Country Name (2 letter code) [AU]:US
State or Province Name (full name) [Some-State]:Minnesota
Locality Name (eg, city) []:
Organization Name (eg, company) [Internet Widgits Pty Ltd]:Wheatevo
Organizational Unit Name (eg, section) []:
Common Name (e.g. server FQDN or YOUR name) []:traefiktest.local
Email Address []:
Create Kubernetes Secret
Now that we have an SSL certificate available, we can add it into Kubernetes as a new TLS secret.
kubectl create secret tls traefiktest-cert --cert=traefiktest.crt --key=traefiktest.keyAfter the new secret is created, verify it using kubectl get secret traefiktest-cert:
kubectl get secret traefiktest-cert
NAME               TYPE                DATA   AGE
traefiktest-cert   kubernetes.io/tls   2      52m
Create Test Deployment and Service
Before we can create the new Traefik IngressRoute, we will need a service we can use as a destination. Create whoami.yaml and include the following content:
kind: Deployment
apiVersion: apps/v1
metadata:
  name: whoami
  namespace: default
  labels:
    app: traefiktest
    name: whoami

spec:
  replicas: 2
  selector:
    matchLabels:
      app: traefiktest
      task: whoami
  template:
    metadata:
      labels:
        app: traefiktest
        task: whoami
    spec:
      containers:
        - name: whoami
          image: traefik/whoami
          ports:
            - containerPort: 80
---
apiVersion: v1
kind: Service
metadata:
  name: whoami
  namespace: default

spec:
  ports:
    - name: http
      port: 80
  selector:
    app: traefiktest
    task: whoami
Apply the new deployment and service with kubectl apply -f whoami.yaml:
kubectl apply -f whoami.yaml
deployment.apps/whoami created
service/whoami created
Create Traefik IngressRoute
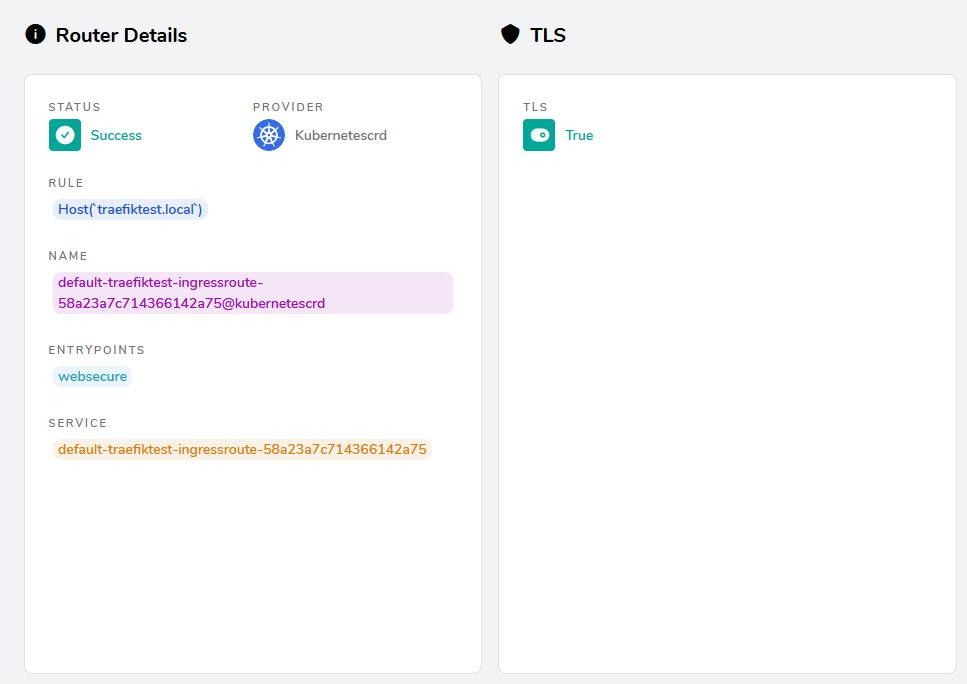
We are finally ready to set up routing to our new whoami service. Create whoami-route.yaml and include the following content:
apiVersion: traefik.containo.us/v1alpha1
kind: IngressRoute
metadata:
  name: traefiktest-ingressroute
  namespace: default

spec:
  entryPoints:
    - websecure

  routes:
  - match: Host(`traefiktest.local`)
    kind: Rule
    services:
    - name: whoami
      port: 80
  tls:
    secretName: traefiktest-cert
This route will ensure that all traffic sent to traefiktest.local over the websecure entrypoint will be forwarded to the whoami service over port 80. The TLS secretName is set to the name of the secret we created earlier to ensure that this traffic will be sent securely.
Apply the new IngressRoute with kubectl apply -f whoami-route.yaml:
kubectl apply -f whoami-route.yaml
ingressroute.traefik.containo.us/traefiktest-ingressroute created
Test the Route over HTTPS
Now we can test the new route by visiting https://traefiktest.local. Your browser may warn you since it is using a self-signed SSL certificate. Accept the warning and proceed to the site.
This should result in output similar to the following:
Hostname: whoami-8576988b7-pcq4g
IP: 127.0.0.1
IP: 10.1.2.189
RemoteAddr: 10.1.2.186:60268
GET / HTTP/1.1
Host: traefiktest.local
User-Agent: Mozilla/5.0 (Windows NT 10.0; Win64; x64; rv:82.0) Gecko/20100101 Firefox/82.0
Accept: text/html,application/xhtml+xml,application/xml;q=0.9,image/webp,*/*;q=0.8
Accept-Encoding: gzip, deflate, br
Accept-Language: en-US,en;q=0.5
Dnt: 1
Referer: https://wheatevo.com/?p=329&preview=true
Te: trailers
Upgrade-Insecure-Requests: 1
X-Forwarded-For: 192.168.65.3
X-Forwarded-Host: traefiktest.local
X-Forwarded-Port: 443
X-Forwarded-Proto: https
X-Forwarded-Server: traefik-7877ff76c9-2rmcj
X-Real-Ip: 192.168.65.3
Congratulations! At this point you should now have a working Traefik TLS route securing traffic to a Kubernetes service.
If you ran into any issues setting up the Traefik IngressRoute successfully, please post a comment below.
One reply on “Traefik 2 and Kubernetes: Basic TLS Routing”
Only thing I want to add is that you should edit “externalIP” in the values.yaml file from the chart. Other than that, this was a very easy to follow guide. Awesome.